Whenever a wish to set up a Test/Demo environment in our Laptops or PCs Virtualbox is a sort of `go-to` virtualization product. Presently, VirtualBox runs on Windows, Linux, Macintosh, and Solaris hosts and supports a large number of guest operating systems including but not limited to Windows (NT 4.0, 2000, XP, Server 2003, Vista, Windows 7, Windows 8, Windows 10), DOS/Windows 3.x, Linux (2.4, 2.6, 3.x and 4.x), Solaris and OpenSolaris, OS/2, and OpenBSD.
Though a few mouse clicks, on its simple interface, helps to create a Virtual Machines a.k.a VMs, some of the configuration tasks are slightly confusing or require a bit extra effort.
One such common requirement is that of creating direct `SSH` session from the host machine to the VMs, especially Linux VMs, deployed on Virtualbox.
The following steps and screenshots will help to understand the procedure to enable an SSH session from Windows host to the Linux VM.
Environment Spec:
Host: Windows 10
Oracle Virtual Box: 6.0
Guest VM: Centos 7.6
Please note, for the sake of completeness I include the steps to import a VM appliance too.
1. From the Virtualbox, interface choose the option to import appliance.
NOTE: A CentOS bases Virtual Appliance (OVA) available in the URL: bit.ly/devconf-rm-vm

2. Select the required `VM Appliance` file and `Open` it.

3. Click `Next` in the `Appliance to Import session`.

4. You may change the `Virtual Machine properties` or leave it to the defaults as in the case of this example. Click on `Import` to complete the importing of the virtual appliance.

5. After the completion of the importing, select the VM from the left pane and click on `Start` to run it.

6. From the Virtualbox, console please verify that the Linux `booting process` successfully completing.

7. Now you could log into the VM from the Virtualbox console.
TIP: The example appliance will allow you to `login` using the following credentials.
Example VM Credentials:
User Name: root
Password: centos

8. List the IP address allotted to the VM using the command `ip a`.

9. Note the `IP Address` of the VM to which the `SSH` access need to enable.
TIP: The IP address of the example VM is 10.0.2.15. You may find a different IP address in your environment.

10. To Configure the port forwarding to enable the SSH access from the Host, select the VM from the left pane and click on `Settings`.

11. Select the `Network` option.

12. Make sure the Network of the VM is `Attached to: NAT`. ( If it is attached to a different network, you could choose `NAT` from the drop-down menu ).

13. Click on the `Advanced` option to configure the `Port Forwarding`.

14. Click on `Port Forwarding` .

15. To add a new `Port Forwarding rule`, click on the `+ sign` in the right-hand side as shown in the screenshot.

16. Enter the values as shown in the screenshot and click `OK` to submit.
TIP: You should use the `Guest IP` (IP of the VM) as per the output from the Step#9. Also may choose a different `Host Port`, if the `Port 22` is already used by some other application on the Host.

17. Now it is the time to test the configuration. You may open the `SSH Client` on the Host. In the example, we are using the common SSH client `Putty`. `(https://www.chiark.greenend.org.uk/~sgtatham/putty/latest.html).
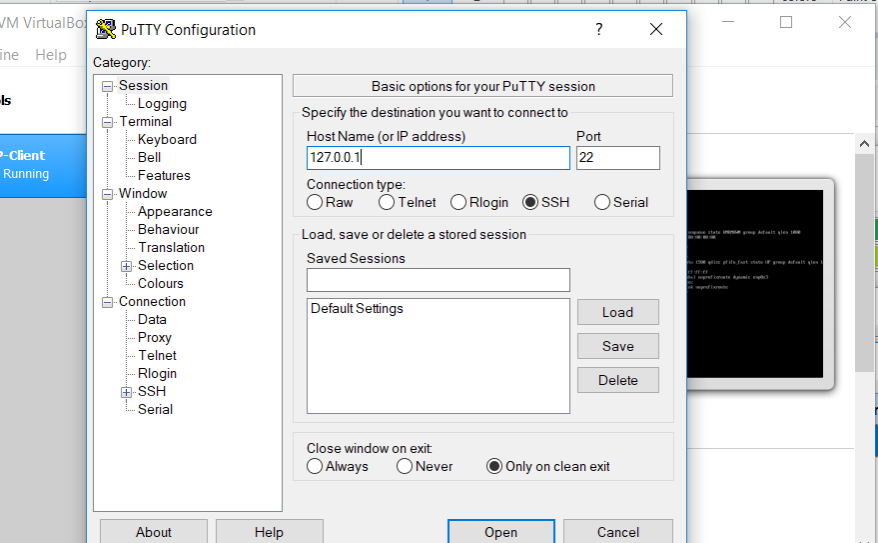
18. Enter `127.0.0.1` as the `Host Name` and `Host Port` as the Port 22.
TIP: You may use the one you configure as the `Host Port` in the previous step.
19: You may click `Yes` to override the Security Alert.

20. You could now use the Putty Terminal to log into the VM.
TIP: You may use the credentials as specified in step#7.

You did it. All the Best !!!!
No comments:
Post a Comment